Saturday 5 August 2017

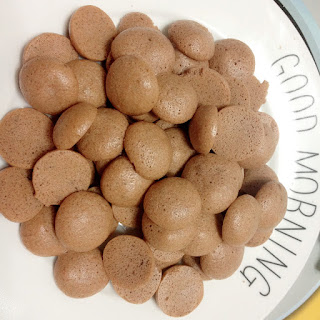
Crunchy Cake Drops

Prep Time: 15min
Cook Time: 20min
Yield: 3-4 servings
Freezer-friendly: No


As strange as the title sounds, this is an accidental recipe found by a busy mama by over-cooking the mini cake drops. It's so crunchy that my kid loves it and requested it again!

Ingredients:

2 egg yolks
40g all purpose flour
1/4tsp baking powder
20ml grapeseed oil
15ml water/milk

2 egg whites
10g castor sugar
Few drops of apply cider vinegar

Steps:

1) Pre-heat oven at 160 Degree Celsius.
1) Mix egg yolk, flour, baking powder, oil and water until combined.
2) In another bowl, using an electric mixer, beat egg whites until frothy, then add sugar and vinegar and beat until the mixtures turn stiff peak.
3) Fold the egg white mixture to the egg yolk mixture gently in 3 batches.
4) Put into the batter into a piping bag, cut the tip of the piping bag.
5) Pipe the batter into mini cake drops of 2cm each onto a baking tray lined with parchment paper.
6) Bake for 40 minutes, cake drops should be brown at edges, lift a cake drop using a fork, if the bottom does not stick on the parchment paper, its done. If not, bake for another 2 min and try again. Repeat until you get the desired results.


Petite Hanjuku Cheesecake

Prep Time : 15 min
Cook Time : 60 min
Yield : 22 mini cheese cake


I literally fell in love with Hanjuku Cheesecake when I first tried in a newly opened Sushi King Restaurant at my area. Same goes to my princess. 

So I determined to make this cake at home as it costs me RM4.24 per cheesecake. And this 22 petite cheesecake? It costs me less than RM30. Though labour costs has yet to be factored in, but it does feel great to be able to enjoy this at the comfort of my own home. Coffee anyone? Haha.

Ingredients:

500g cream cheese
135g fresh yogurt
50g milk
5 large eggs
65g unsalted butter + more for brushing mushipan
1/2 tsp salt
35g corn starch
100g castor sugar

Little icing sugar for deco (Optional)

Steps:
1) Melt room temperature cream cheese in a bowl using double boiler method. Remove the mixture from fire.
2) Add in fresh yogurt and milk. Stir until combined.
3) Separate egg white & egg yolk.
4) Add butter, salt and corn starch to egg yolk, whisk until combined. Pour into cream cheese mixture.Whisk until combined.
5) Strain the mixture to remove lumps.
6) Pre-heat oven at 160 degree celcius.
7) Beat egg whites using an electrical mixer until frothy. Add sugar gradually and beat until soft peak is form.
8) Fold 1/3 of egg whites into the cream cheese mixture using a spatula. Repeat twice.
9) Brush mushipan with soften butter and pour the batter in until 3/4 full.
10) Turn down temperature to 140 degree celcius and steam-bake for 60 minutes or until inserted toothpick comes out clean. In order to do steam-bake, put a pan of hot water in the lowest rack. I use the hot water in Step 1.
11) Cool the cheesecake in the pan for 5 minutes, run a palate knife around the mushipan and drop the cake out, let cool on wire rack before transferring to an air-tight container and chill for at least 2 hours before serving. Sieve some icing sugar on top for decoration.


Friday 4 August 2017

Double Chocolate Greek Yogurt Muffins

Prep Time : 5min
Cook Time : 20 min
Yield : 12 muffins
Freezer-friendly : Yes


Ingredients:

1 1/2 cup organic rolled oats
1/8 cup cocoa powder
1/4 cup brown sugar
1 1/2 tsp baking powder
1/2 tsp baking soda
2 large eggs
4 small ripe bananas
1 cup plain greek yogurt
1/2 cup mini chocolate chips
Little olive oil for greasing

Steps:
1) In a bowl, mix all ingredients except chocolate chips and oil. This is a great activity for my kid where she will help to put the ingredients into the mixing bowl and mix with a spatula. Alternatively, you can put all ingredients into blender directly.

2) Put the mixture into blender and blend for about 3 minutes, scrapping down the sides of the blender, until the mixture is smooth. Do not worry about the dry look of the mixture as it will become a cake batter consistency once blended.

3) Pre-heat oven at 200 degree celcius.

4) Mix chocolate chip into the batter using spatula. Arrange cupcake liner on the muffin pan, grease the liner before pouring the batter until 3/4 full.

5) Bake for 20 minutes or until inserted toothpicks come out clean.

6) Serve warm. I love to serve with my homemade 3 ingredient green tea ice cream.


Original Recipe : www.runningwithspoons.com/2015/05/08/double-chocolate-greek-yogurt-muffins/

3 Ingredient Green Tea Ice Cream

Prep Time : 15min
Freezer Time : 6 hours-overnight
Yield : 8 servings
Freezer-friendly : Yes


Ingredients:

4 1/2tsp green tea powder
3 tbsp hot water
1 cup ready to whip topping
4 tbsp chilled sweetened condensed milk

Steps:

1) Mix green tea powder with hot water and let cool. Add chilled condensed milk and mix till combined.
2) Whip topping until stiff. If you are staying in a hot country like Malaysia, place a bowl of ice water beneath the mixing bowl filled with whip topping while whipping.
3) Gentlly fold in the green tea mixture using a spatula.
4) Transfer into glass container or baking pan, cover with cling wrap and freeze for at least 6 hours.

Original recipe: http:///eugeniekitchen.com/green-tea-ice-cream/

Wednesday 5 July 2017

Steamed Yellow Onion Juice (Home Remedy for Cough)

Prep Time : -
Cook Time : 1 Hour
Yield : 1 adult serving
Freezer friendly : No


Ingredient:
1 big yellow onion


Steps:
1) Cut the top and bottom part of the onion and peel.
2) Put onion in a bowl, steamed for 1 hour.
3) Pour the steamed onion and its juice through a sieve, using a spoon, press steamed onion so that the juice will go through the sieve.  Using the spoon, flip the steamed onion and press again. Repeat until you do not see any onion juice seeping out when you press the steamed onion. This step is crucial to extract more onion juice.
4) Serve while it is still warm.

While this remedy is written for kids, it is also working well for myself. I have a tip for those who cannot stands the smell of the onion like me. Pour the onion juice into a wide-mouth bowl or a plate and consume while its still warm, at least it does not smell too onion to me and I am able to make it down my throat. Storing the onion juice in a small container or jar will make the onion smell stronger especially the moment I open the lid. My 4 year old does not seem to have this issue, she drinks it as if its a delicious little bowl of soup and I am quite happy with this haha.

If I am not going to consume immediately, I would keep it warm for few hours and do Step 3 when I am ready to consume. In the case of kids, if they cannot finish in 1 serving, keep in the fridge and warm it up for other servings but within a day.

This has helped my 4 year old to reduce cough and phlegm. The results can be seen after 3 days of consumption of 1 serving daily. I also applied Baby Balsam Vicks on the chest, back and under foot area with socks on thereafter before going to bed each night. The application of Baby Balsam Vicks had reduce a lot of the night time coughing.

Here are the step by step photos:

 Cut & peel onion, place in a glass bowl

Put water into the inner pot

Place the steamer rack & bowl with onion into the inner pot

Insert the inner pot into the smart cooker, select steam (1hour)
  
Take out the bowl, be careful, it's hot!

Spoon the onion and put onto the sieve, which was place on top of the glass bowl, 
press the onion using a spoon

Flip the onion using the spoon, press again, notice that juice will 
seep out along the edge of the spoon

Repeat until you don't see any juice seeping out. 

 Another tip is to hold the seive with one hand so that there is gap in between the sieve and the bowl. Press with spoon with another hand, if you see juice going through the seive to the bowl, repeat the step until no more.

Tadaaa, my onion juice, extracted with love...

Store in a container with lid and chill. Warm it up when ready to serve. 
Consume the same day.


Thursday 6 April 2017

Simple Sandwich Toast

Prep Time : -
Cook Time : 12 min
Yield : 2 servings
Freezer Friendly : No


Ingredients:

1tsp butter
2 slices homemade raisin bread
1 chicken sausage,sliced
1tbsp shredded mozzarella cheese
Sprinkle of pork floss (optional)

2 tsbp olive oil
2 eggs
Sprinkle of Italian seasoning (optional)

2 bananas

Steps:
1) Heat 1 tsp butter in a wok under small fire. Spread the melted butter by swirling the wok.
2) Put a slice of bread into the wok. Spread sliced chicken sausage onto 1 slice of bread, then top with mozzarella cheese and another slice of bread to make a sandwich.
3) Place a ceramic bowl on top to keep the sandwich neat. After about 2-3 min, the bottom slice of bread turns brown, flip the sandwich with a spatula.
4) When the bottom slice of bread turns brown, serve by cutting the sandwich into 2. Sprinkle sandwich with pork floss and serve with sunny side up.
5) While the wok is still hot, under small fire, put 1tbsp olive oil and crack an egg onto the wok. It is important that the oil is cold to get a smooth looking egg. Close the lid, wait for 1 min, sprinkle Italian seasoning and serve. There is no need to flip the egg as the heat will be evenly distributed to 'cook' the upside of the egg when the lid is closed. Repeat with the other egg.
6) Serve with banana to make a complete meal.

Thursday 17 November 2016

Mini Cake Drops

Prep Time: 15min
Cook Time: 20min
Yield: 3-4 servings
Freezer-friendly: No


Recipe adopted and modified from Mummy Yen Li on FB page 'Healthy Food for Baby'.

Ingredients:

2 egg yolks
40g all purpose flour
1/4tsp baking powder
20ml grapeseed oil
15ml water/milk

2 egg whites
10g castor sugar
Few drops of apple cider vinegar

Steps:

1) Pre-heat oven at 160 Degree Celsius.
1) Mix egg yolk, flour, baking powder, oil and water until combined.
2) In another bowl, using an electric mixer, beat egg whites until frothy, then add sugar and vinegar and beat until the mixtures turn stiff peak.
3) Fold the egg white mixture to the egg yolk mixture gently in 3 batches.
4) Put the batter into a piping bag, cut the tip of the piping bag.
5) Pipe the batter into mini cake drops of 2cm each onto a baking tray lined with parchment paper.
6) Bake for 20 minutes, cake drops should be a little brown in colour, lift a cake drop using a fork, if the bottom does not stick on the parchment paper, its done. If not, bake for another 2 min and try again. Repeat until you get the desired results.
7) I packed this with jam for my pre-schooler's morning snack, she told me she loves it and would like to have it again! Yay!


Here's another one which I have added a tsp of cocoa powder and additional 5ml of water into the batter to make a chocolate version.